Objectives
- Add Log time to a Corporate MatterRecord expenses time entries related to a Corporate Matter
- Add Log time to the Litigation case
- Record expenses related to the litigation case
Environment
- Corporate Matters
- Litigation Case Module
Additional Information
The Corporate Matters and Litigation Case Modules also allows you to
- Use the timer to set log time
Procedure
In App4Legal, there's an expense and time tracking modules.
- corporate matter.
- Record the time on matters using a timer.
Steps
The Time Tracking module In LEXZUR enables you to track your time manually by adding your time logs, or automatically by using the timer embedded inside App4Legal.
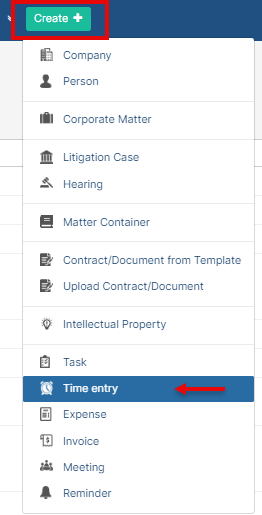
First you will be able to log time from the quick add button in the main menu -> Log time.
You will be able also to log time by simply clicking on the ID or name of the Litigation case → Go the Time Logs tab → Click on the actions button → Log time.
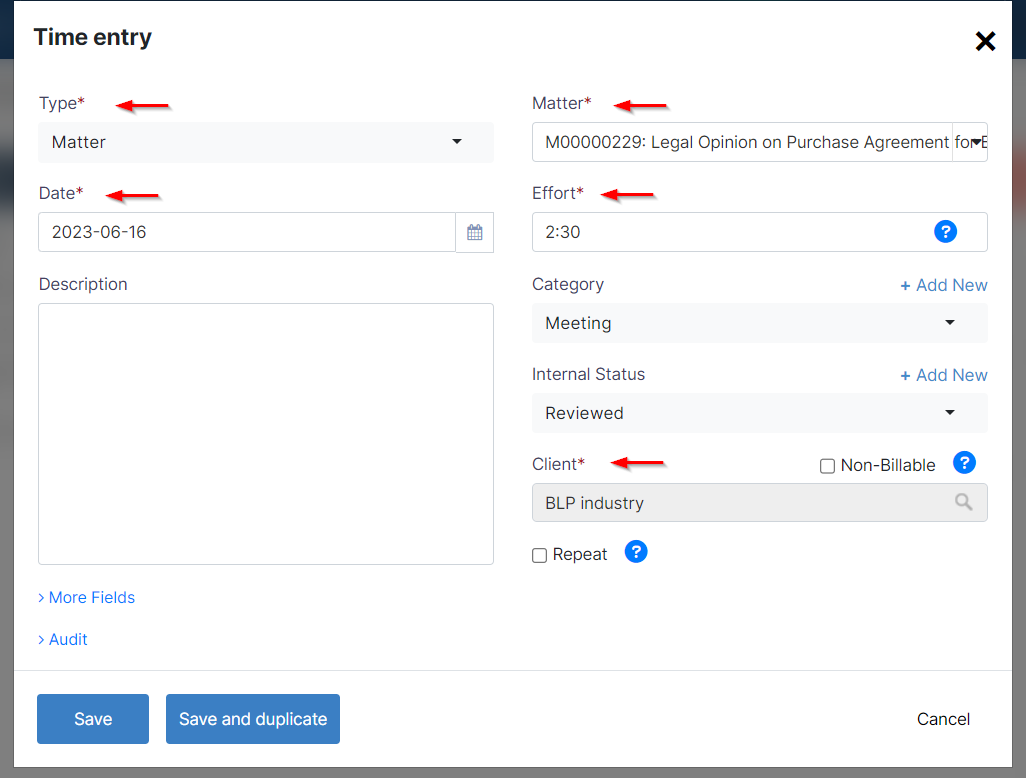
The following window will appear:
There are 5 mandatory fields: Type, Matter/Task, Date, Effort and client.
- Type: The matter or Task that the Time is logged on.
- Matter/ Task: It depends on the type to enter matter ID, name, client name or to enter the Task.
- Date
- Effort: Time logged in hours. If using the Manage Timer, the system will automatically calculate the Time in hours.
- Comments: Description of the Time log.
- Category: A customizable drop-down list
- Internal Status: A customizable drop-down list. It can be reviewed, to be reviewed and so on.
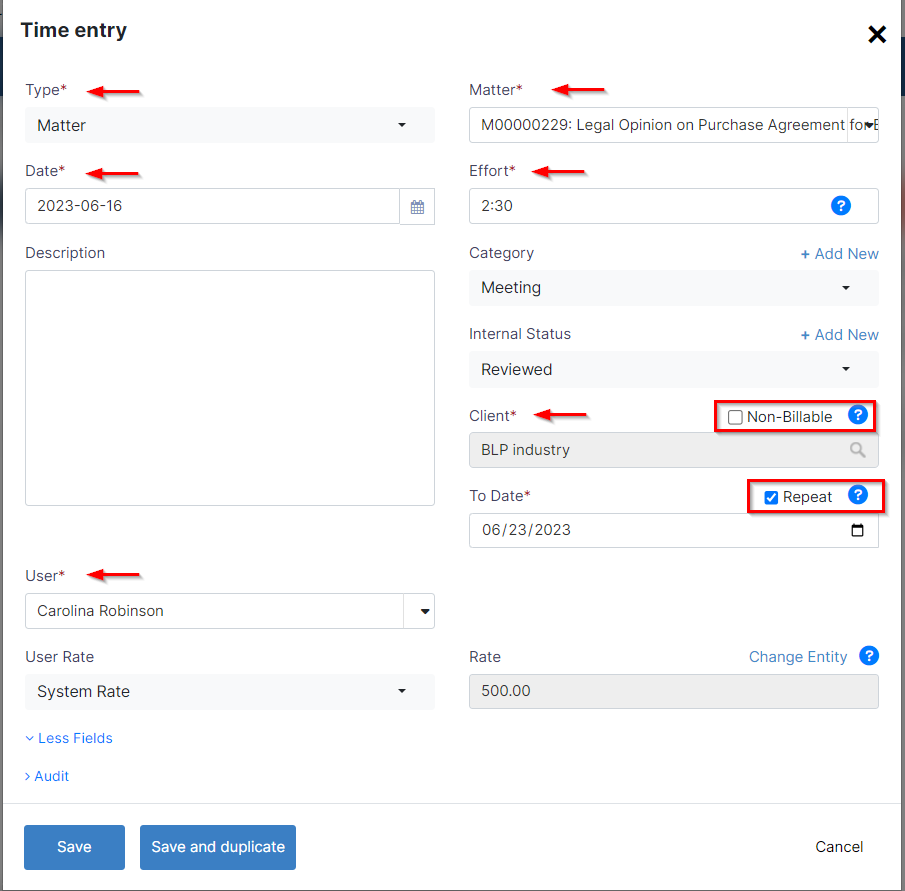
- If non- Billable is chosen: time log is non-billable
- If Repeat is chosen: time logs will be repeated on daily-basis. Weekend days will be excluded.
- If you click on More fields: User: By default it is the Logged in App4Legal User. However, the User can be changed such that a Time Log can be added on behalf of another user.
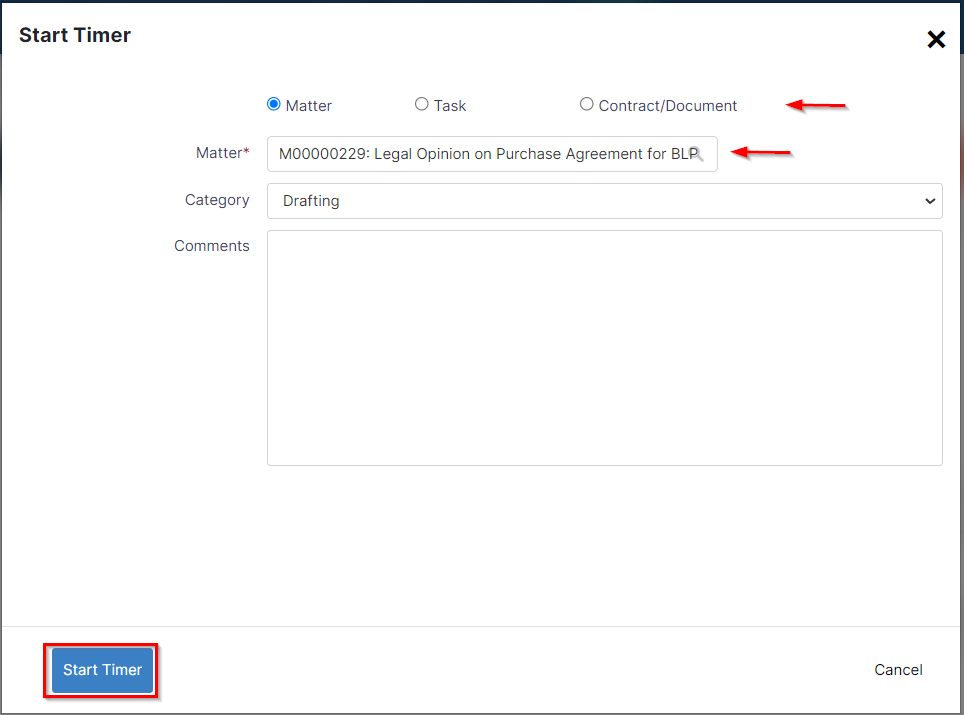
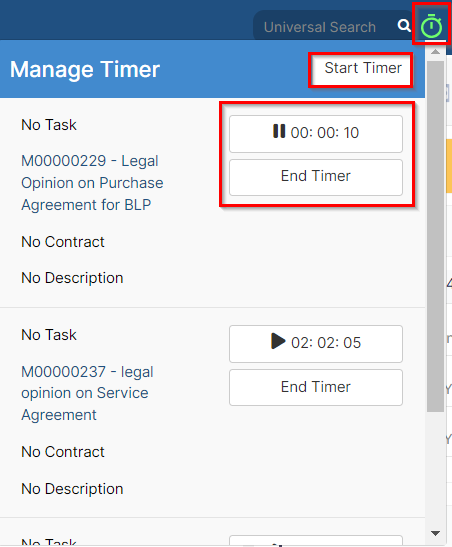
You can also log time automatically by enabling the timer embedded inside App4Legal. Click on the timer available in the main menu → Start Timer.
Choose if you start the timer on a task or matter, select the matter name or the task name based on the type, choose a category and add comments if needed then click on the start timer button.
Once you are done, you will be able to pause the timer or end the timer.
You can also record a new expense to a Corporate matter or a Litigation Case. You can do that from the Quick add button and the select expense.
You can also do so by simply clicking on the ID or name of the Litigation case or corporate Matter → Go to the Expenses tab → click on the actions button →Record expense.
There are 5 mandatory fields: Expense category, payment method, paid through, amount and paid on.
- Expense Category: Categories are defaulted in the Money Settings.
- Payment Method: The method determines the types of accounts that appear accordingly:
Cash: Cash Accounts
Credit Card: Liability of type Credit Card Accounts
Cheque & Bank: Bank Accounts
Online payment: Bank Accounts and Credit Card Accounts
Other: Cash, Bank and Credit Card Accounts
- Paid Through Account: The Account that appears as per the Payment Method. Accounts can be added on the fly via the Add account hyperlink. The Add account form will provide users the possibility to add Accounts of type Cash, Bank and Credit Card using this link.
- Amount
- Balance: After choosing the Paid Through Account, the system will automatically display the Balance of the Account for information.
- Exchange Rate: Exchange Rates will be used only in case the Paid Through Account's currency is different than that of the Entity.
- Paid On date
- Inclusive Tax
- Comments
- Reference#
- Supplier: Looks up from the list of Suppliers
- Related Matter: If Expenses Are Recorded directly from the Related Expenses tab in a matter form, then the matter comes selected by default.
- You can relate to task, Hearing or Event if needed.
- You can choose if Internal or Client. When the Client is chosen, it could then be either Billable or Non-Billable
- Upload Document: Any attachment related to the Expense such as vouchers or similar. The Attachment can then be tracked in the Related Documents tab of the Expense.
Once you record all the expenses related to a Corporate Matter or a Litigation Case, you can preview all the expenses in the grid and you have the option to export them into a spreadsheet for other reporting purposes.
Thank you!
...
the system.
To do that, simply open the matter, click on the Time Entries tab, click on the Actions button, then choose "Time entry", to record the time spent on a particular activity.
| Info |
|---|
You can also add any time entry directly from the Create button, and link it to the desired matter. |
Adding time entries from the matter's page automatically sets some values, such as Type and the Matter name.
Likewise, the current date is set. However, you may choose another date and indicate the Effort logged in hours.
The Client Name is automatically retrieved from the related matter's information as well.
Time log entries are billable by default unless you check the non-billable box.
Additionally, admins can choose the user related to such time entry and the user rate. Therefore, they can choose between either the system's predefined rate or a fixed rate.
Time Logs could also be repeated on a daily basis. Check the Repeat option and set the To Date.
| Note |
|---|
Weekend days and holidays will not be included in the repeated time logs. |
Furthermore, you can also log time automatically by starting the timer embedded inside the system.
Click on the timer within the navigation menu → Start Timer.
Choose the Type and specify the matter name, choose a category, and add comments if needed.
Upon finishing, you will have the option to pause or end the timer, and the system will automatically calculate and log the time to the related matter.
To end the timer, click on "End Timer." Specify the client name and indicate whether it is billable or an internal time log. Finally, select the option to end the timer.
For more information about LEXZUR, kindly reach out to us at help@lexzur.com.
Thank you!


